Penguin as Bluetooth Device (non HID!) (2012)
Arduino code running on the Arduino board >> https://github.com/plusea/Penguin-Interface/tree/master/code/a_penguin_send2
Basic setup:
– unzip the back of the penguin
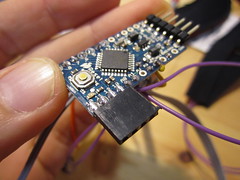
– connect the Bluetooth module to the Arduino so that it looks like this:

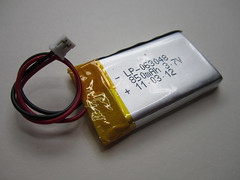
– connect the battery to the battery board:

– power the penguin circuit, by turning the switch on the battery board “on” (the Bluetooth module should light up and blink red)
– open the Bluetooth preferences of your computer and opt to pair with a new Bluetooth device
– the Penguin should show up as a Bluetooth device with the following address: “/dev/tty.RN42-E59C-SPP”
– opt to connect with passcode and type “1234”, which is the generic passcode
– once paired successfully you can now interface with the penguin either via the Arduino serial monitor or via the processing application.
– once the Penguin has paired successfully with your computer you can zip it back up at anytime, but before doing so you might want to re-arrange some of the sensors and actuators
– the sensors and actuators are intentionally mounted on long wires so that we can test different placements to determine best placement, here are some suggestions for best placement:
* the LED light should go where the heart is
* the tilt sensor can go anywhere but should be oriented so that tilting the penguin triggers the right directions
* the vibration motor should go close to the belly of the penguin so that it can be felt when holding the penguin close
* the squeeze sensor should go right in the middle of the stomach, or wherever the most squeeze is happening
* the bend sensors should go in the wings
* the speaker can go anywhere
Talking to Penguin via Serial Monitor
– Download and install arduino
– Run the Arduino software and open the serial monitor
– in the lower right hand corner set the baud rate to “115200”
– the Serial Monitor should start printing lines of numbers, which mean the following:
rightBendAmount [0,1,2,3], leftBendAmount [0,1,2,3], squeezeAmount [0,1,2,3], tiltDirection [1,2,3,4], accelerometer X [0-1023], accelerometer Y [0-1023], accelerometer Z [0-1023]
– at the top of the serial monitor you can type and send characters
– the following characters should trigger the following Penguin events:
r = red light
g = green light
b = blue light
w = white light
z = light off
q = quiet melody
m = moderate melody
l = loud melody
n = melody off
t = timid vibration
v = medium vibration
h = hard vibration
s = no vibration
Talking to Penguin via Processing Application
The processing application is basically the GUI interface for the above scenario using the serial monitor.
– download and install the processing software, open the following sketch:
processing code for application >> https://github.com/plusea/Penguin-Interface/tree/master/code/p_penguin_vis
– run the sketch and a new window should open and look like this:
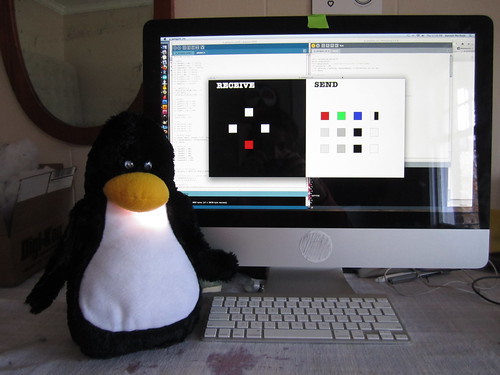
– the left side of the window with the black background visualizes the sensor data from the penguin
– the right side of the window with the white background allows you to send data to the penguin by clicking on the various boxes:
first row) LED: red, green, blue, white and off
second row) SPEAKER: low, medium, high, off
third row) VIBRATION MOTOR: low, medium, high, off