Step 12: Software (2014)
Once you’ve physically, or wirelessly connected your gloves to your computer you now want to read or see that data somehow, and use it to make music, visuals or something. This post describes how to read the gloves data in via a software called Glover. Glover receives the sensor data from the gloves and also allows you to set certain postures which are then recognished using a neural network. The sensor data, along with the posture data is then sent out as OSC messages. You can then read these OSC messages in to various other software such as Ableton, MaxMSP, Supercolider, Processing….
Glover
Glover is a software written in C++ by Tom Mitchel
WARNING: When running Glover do not unplug the FTDI cable from your computer as it can cause your computer to crash!
Always save and backup your files. If the software causes your computer to crash, you don’t want to loose your work!
Downloading and Installing Glover
The most current version of Glover (“GloverArduIMU”) can be downloaded from The Gloves Project Bitbucket code repository:
>> https://bitbucket.org/theglovesproject
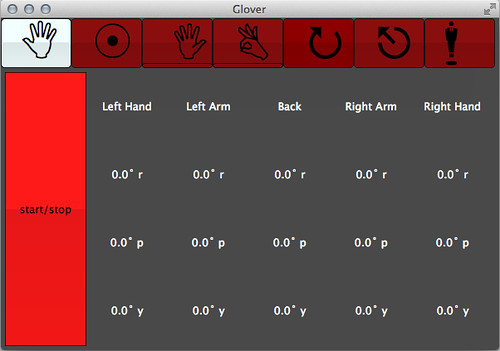
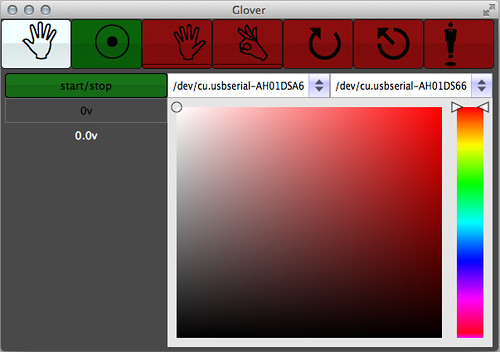
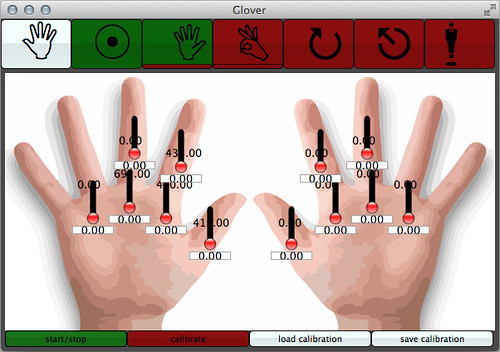
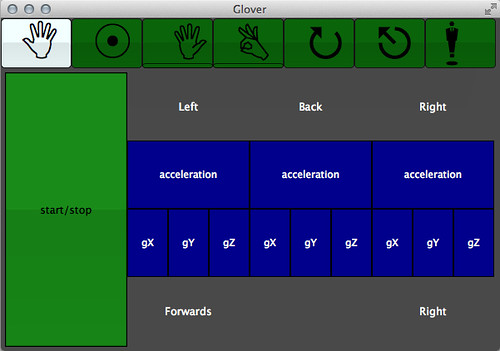
When you first open Glover the application window will look like this:

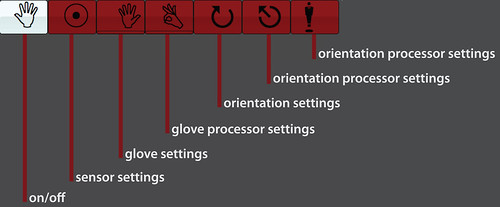
The symbols along the top open different “tabs”. The naming of the tabs is currently not the best. Here short descriptions of the different tabs:
– On/Off
– Sensor Settings (connection settings and LED colour test, vibration motor test settings should also be in here)
– Glove Settings (bend sensor calibration)
– Glove Processor Settings (posture recognition training)
– Orientation Settings (shows incoming IMU data)
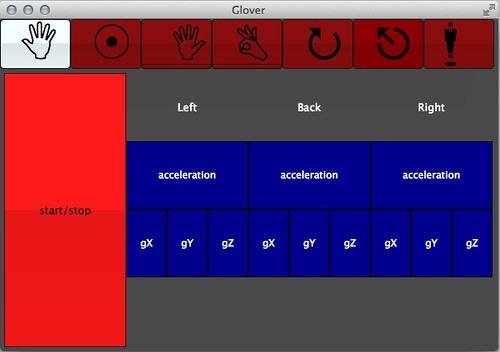
– Orientation Processor Settings I (shows drum-beat detection)
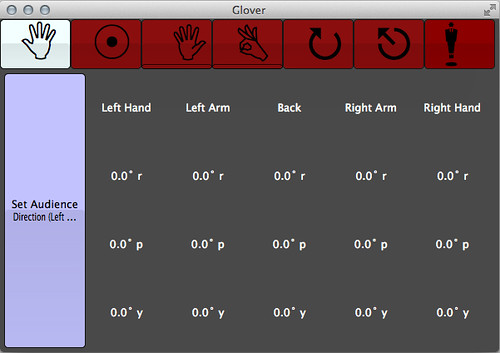
– Orientation Processor Settings II (allows wearer to set a direction for the audience)
Here a quick run-through of the different tabs:
Sensor Settings (connection and LED), Glove Settings (bend sensor data), Glove Processor Settings (bend sensor data)
Orientation Settings (IMU sensor data), Orientation Processor Settings I (IMU sensor data), Orientation Processor Settings II (IMU sensor data)
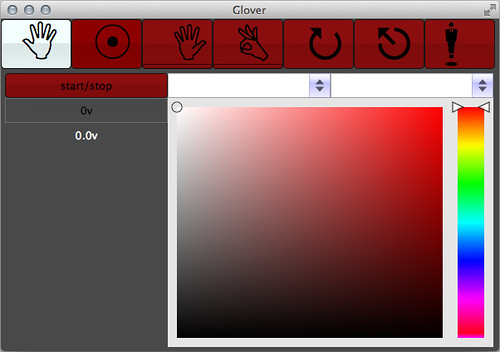
Sensor Settings
In the tab called Sensor Settings select the port name of your left glove from the left drop-down menu and the right glove from the right drop-down menu. Then click on the start/stop button and it should turn green.

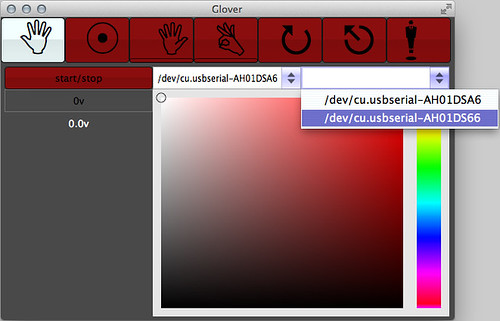
With your mouse cursor you should be able to play with the colour settings in the window and change the colours of the LEDs on both gloves.
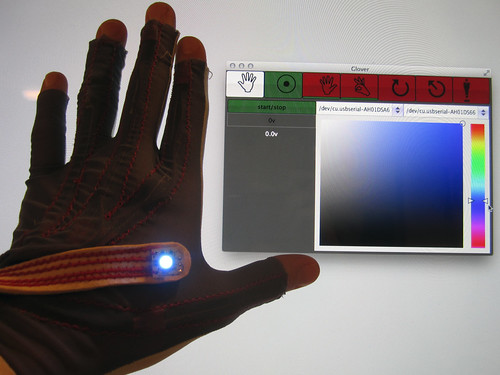
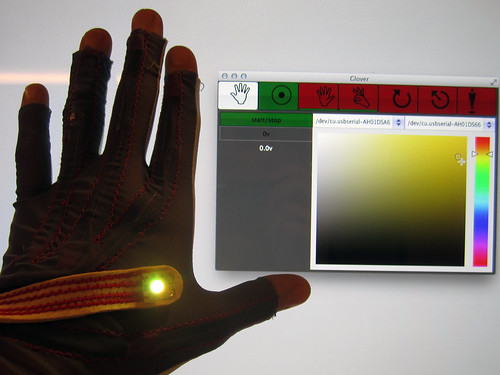
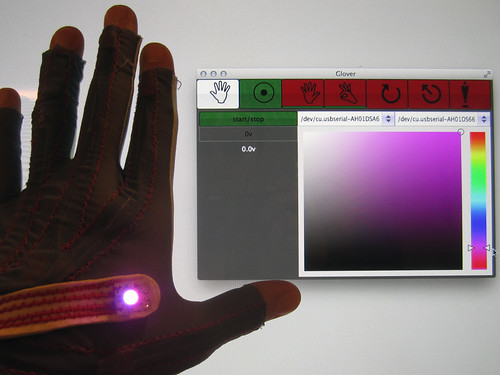
Video of playing with RGB settings of LED:
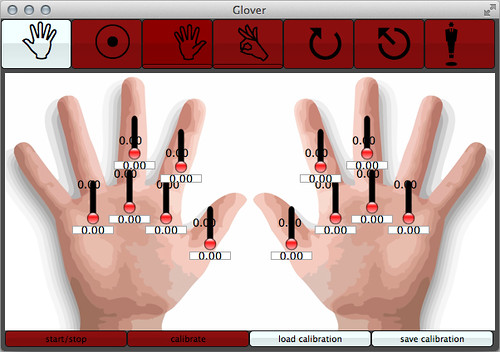
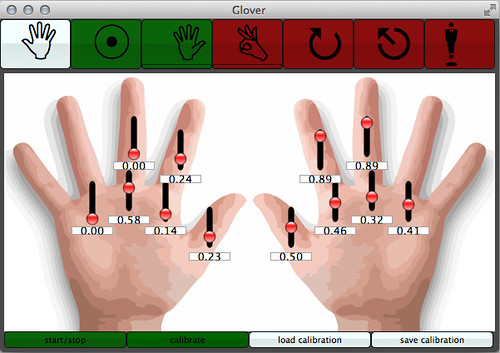
Glove Settings
In the tab called Glove Settings click on the start/stop button at the bottom. It should turn green, but probably nothing more will happen. Click on the calibration button and a progress par window should open. Open and close your hands and move your fingers as much as possible, try to make every gesture possible. This is to collect the min and max values of every bend sensor. After the calibration is complete the sliders in the illustration should move from the bottom to the top as you open and close your hands.

Video of bend sensor calibration:
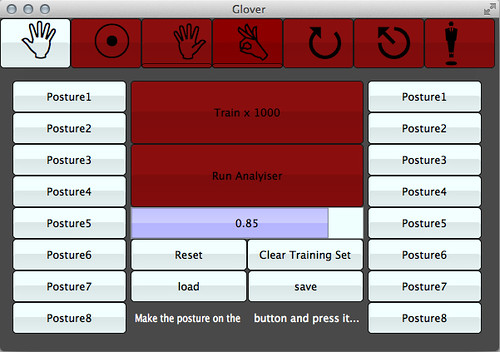
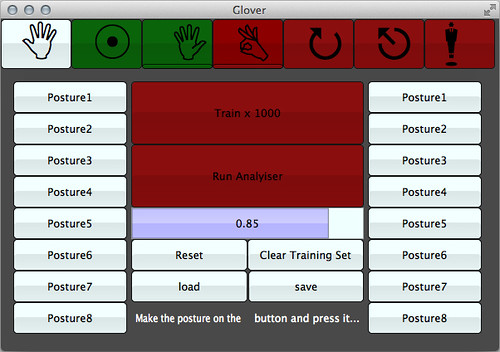
Glove Processor Settings
In the tab called Glove Processor Settings you can train the neural network to recognize postures of your left and right hand. Decide on a posture to make, for example “open hand” or “fist” or “one-finger point”. Make that gesture and while making it click on the “Posture 1” button. Keep making the same gesture in slightly different variations (more tension in your muscles, more relaxed), and keep clicking on the same “Posture 1” button. This is to train the system to recognize slight variations of the same gesture. Once you have captured at least 10 variations of the same gesture, move on to capturing the next gesture the same way. The more discrete postures you input to the system, the more accurately it can differentiate between them. Once you have captured 3 or more different postures you can click on the “Train” button. Once it has trained, click on the “Run Analyzer” button and now when you repeat the postures that you trained the system to recognize you should see them appear written at the bottom of the application window.
Video of training session:
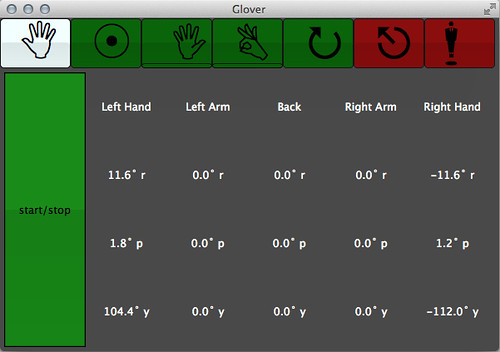
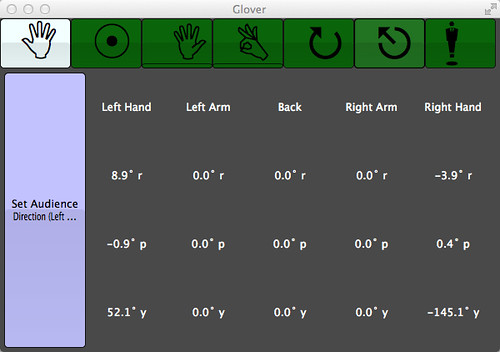
Orientation Settings and Orientation Processor Settings I and II
The last three tabs display the sensor data from the IMU. The first simply shows you the data, the second displays when a drumbeat or motion of the hand in a certain direction is detected and the third lets you set the direction of the audiance.
Video of drum-beat detection:
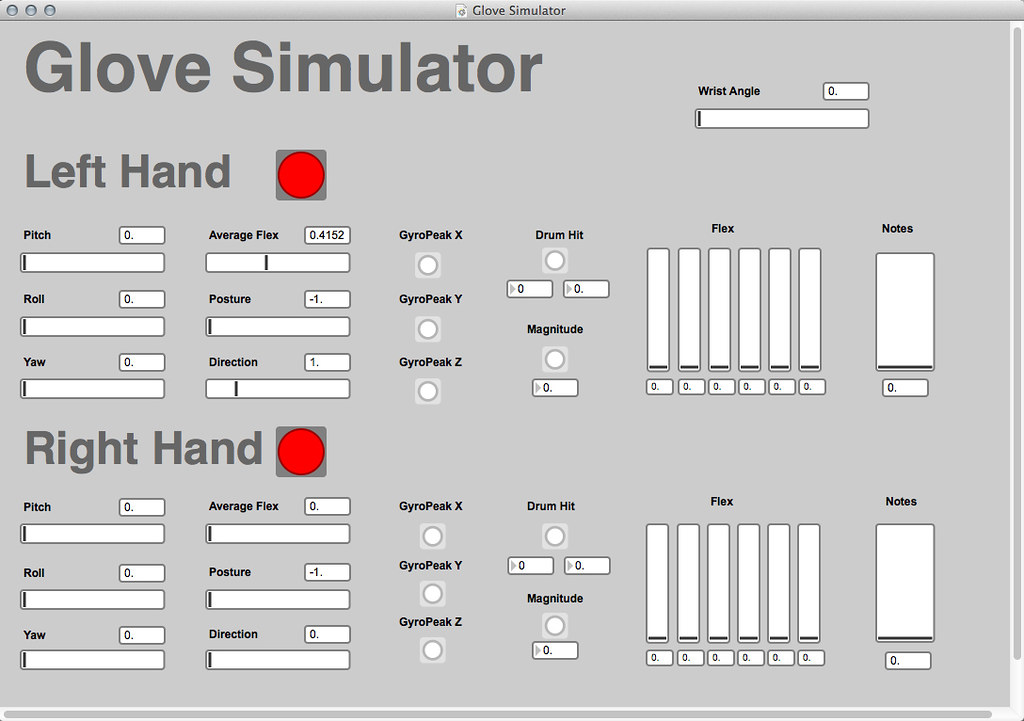
Gloves Simulator
Because not everybody has a pair of gloves, Adam Stark has written a Gloves Simulator, a graphical interface that allows you to simulate the various sensor data that The Gloves generate by moving sliders in the GUI.
The Gloves Simulator can be downloaded from The Gloves Project Bitbucket repository:
>> https://bitbucket.org/theglovesproject
Because The Gloves Simulator runs in Max you will at least need to download a run-time version of Max (free) if you don’t already have the free trial or paid version installed:
>> http://cycling74.com/downloads/runtime/
Screen-shot of The Gloves Simulator:
Bridges
Adam Stark has written a range of what he calls “bridges” which are code examples for various platforms such as Ableton, MaxMSP, Supercolider, Processing…. that read in the OSC messages that Glover generates.
Download Bridges >> https://bitbucket.org/theglovesproject/bridges
Processing Bridge
Downloading and Installing Processing
Processing >> http://processing.org/download/
Because the Processing bridge uses the oscP5 library you need to download this and put the folder into your Processing libraries folder.
oscP5 library >> http://www.sojamo.de/libraries/oscP5/
Unzip and put the extracted oscP5 folder into the libraries folder of your processing sketches. Your processing libraries folder will be inside your sketchbook folder. By default this is normally here: “Documents >> Processing >> libraries”, or you can see the path by opening Processing and clicking in the top menu bar on: “Processing >> Preferences”, and then it will show you your sketchbook location, and let you change it if you want to.
The Processing sketch is missing the following code:
void setup() {
fontA = loadFont(“Helvetica-40.vlw”);
textFont(fontA, 32);
textAlign(LEFT);
}
and you need to add the font:
tools >> create font >> Helvetica-40 >> ok
Screenshot of Adam’s Processing bridge:
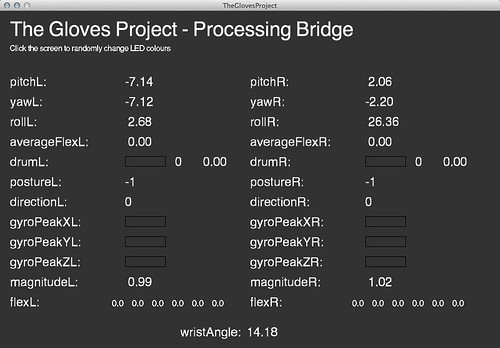
Adam’s GlovesData class covers all the receiving of the OSC messages, so all you need to do is include the class in your sketch (GlovesData.pde) and write code that makes use of the incoming sensor values. And you can also set the LED colours. You will find the GlovesData.pde file inside the TheGlovesProject processing example folder when you download it from the Bitbucket repository:
>> https://bitbucket.org/theglovesproject/bridges
Get Data
void setup() {
size(1000, 800);
gloves = new GlovesData();
}
void draw()
{
background(100);
fill(255,0,0);
rect(gloves.rollR,gloves.yawR,gloves.pitchL,gloves.pitchL);
}
Set LED Colours
gloves.setRightLEDColour(red[0-255], green[0-255], blue[0-255]);
Processing Drawing Example
Code and description coming soon…

Processing Servo and Bottles Example
Code and description coming soon…
Max Bridge
OpenFrameworks Bridge
PureData Bridge
Ableton Bridge
Python Bridge
Reaktor Bridge
SuperCollider Bridge
OSC Dictionary
>> https://bitbucket.org/theglovesproject/bridges
Recieving
/glover/orientationL, f, f, f
/glover/orientationR, f, f, f
where f, f, f = pitch[-180:180], roll[-180:180], yaw[-180:180]
/glover/wristAngle, f
where f = angle[0:180]
/glover/postureL, i
/glover/postureR, i
where i = -1 no posture 0 fist 1 puppet hand 2 open hand 3 1 finger point 4 secret thumb
/glover/flexL, f, f, f, f, f, f
/glover/flexR, f, f, f, f, f, f
where f, f, f, f, f, f = thumb, indexLower, indexUpper, middleLower, middleUpper, ring all [0:1]
/glover/magnitudeL, f
/glover/magnitudeR, f
where f [0:12]?
/glover/gyroPeakXL
/gyroPeakYL
/gyroPeakZL
/glover/gyroPeakXR
/glover/gyroPeakYR
/glover/gyroPeakZR
/glover/drumL, i, f
/glover/drumR, i, f
where i = ? f = velocity [0:1]
/directionL
/directionR 0 forward 1 backward 2 left 3 right 4 down 5 up
Sending
/glover/leds/, i, i, i, i